Following is a guide on properly changing a kernel of your DigitalOcean.com droplet.
If you've updated a kernel on your DigitalOcean.com droplet and now your VM is no longer accessible, following is the guide on how to resolve the issue. This typically happens when you use Webmin's (package updates) or other web-based interface for system administration of Linux/Unix, to do a server kernel update.
Reason for the problem is that kernel on your server doesn't match the kernel selection in DigitalOcean.com settings of your droplet.
For example, let's imagine that your current kernel is this: Linux 2.6.32-431.17.1.el6.x86_64 on x86_64 And you've already changed your machine to to: Linux 2.6.32-431.29.2.el6.x86_64 on x86_64
So now that your server doesn't work, follow below steps:
-
Login to your droplet console with root privileges either through DigitalOcean console (https://cloud.digitalocean.com/droplets/NUMBEROFYOURDROPLET/console), or through Terminal Window (Command Shell) using Putty.
-
Shut down your droplet gracefully by using the command "poweroff" or "shutdown -h" in a terminal window.
-
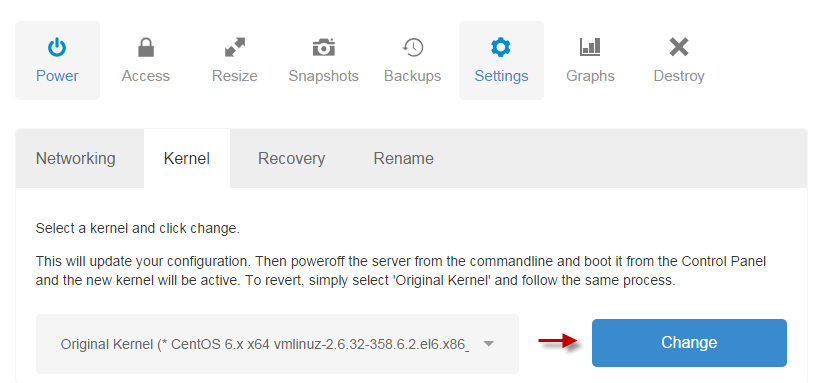
Once your droplet is shut, go to DigitalOcean.com and choose your droplet, then go to "Settings" and select "Kernel" from the list of tabs.
-
Select Kernel (2.6.32-431.29.2.el6.x86_64 on x86_64) and press Change
- Using the DigitalOcean.com control panel turn on your droplet
- Login to your droplet console with root privileges again either through DigitalOcean console or Terminal Window.
- Issue command: uname -a to confirm that your kernel was changed to desired: Linux 2.6.32-431.29.2.el6.x86_64 on x86_64

Now your server should be up and running again.